Complete Guide to Robert's Rules of Order Minutes + Template - iBabs
Complete Guide to Robert's Rules of Order Minutes + Template
Robert’s Rules of Order (also known as RONR or Robert’s Rules) were initially created in the 1870s as a set of parliamentary guidelines. The author, Henry Martyn Robert, was an American soldier who wrote the book as a result of a poorly-ran church meeting. His rules were originally based on the proceedings of the US Senate. Today, Robert’s Rules are widely used for US parliamentary procedure as well as by various types of organisations to help meetings run smoothly.
After its original publication in 1876, Robert himself published the second, third and fourth revisions before his death in 1923. With twelve revisions based on feedback and cultural changes, the latest edition was published in September 2020: Robert’s Rules of Order Newly Revised.
One of the fundamentals of Robert’s Rules is to keep meeting minutes. The minutes are the only record of everything discussed at the meeting. In addition, minutes keep tabs on the result of any votes and actions planned. In this article, we’ll explore how to keep proper minutes according to RONR and will provide a Robert’s Rules Of Order minutes template to help.
What does Robert’s Rules of Order say about minutes?
Minutes are an important record of the assembly or meeting. They also allow absentees to see what was discussed from an impartial point of view, rather than from someone in attendance. Remember that minutes aren’t a play-by-play of everything that happened and everything that all members said (like a court reporter). Minutes are simply a summary of what happened.
We’ve mentioned in another article the crucial role the secretary has to play in a meeting, and the main role includes taking the minutes at meetings. This can be done on paper, on a laptop using an application such as Microsoft Word or on any device you like using board portal software. So, in your role as the secretary, how should you take minutes?
How to structure your minutes
To ensure that everything necessary is included, try the following structure when writing your minutes. To make it easy, keep the order of the minutes the same as the agenda of the meeting.
The opening paragraph
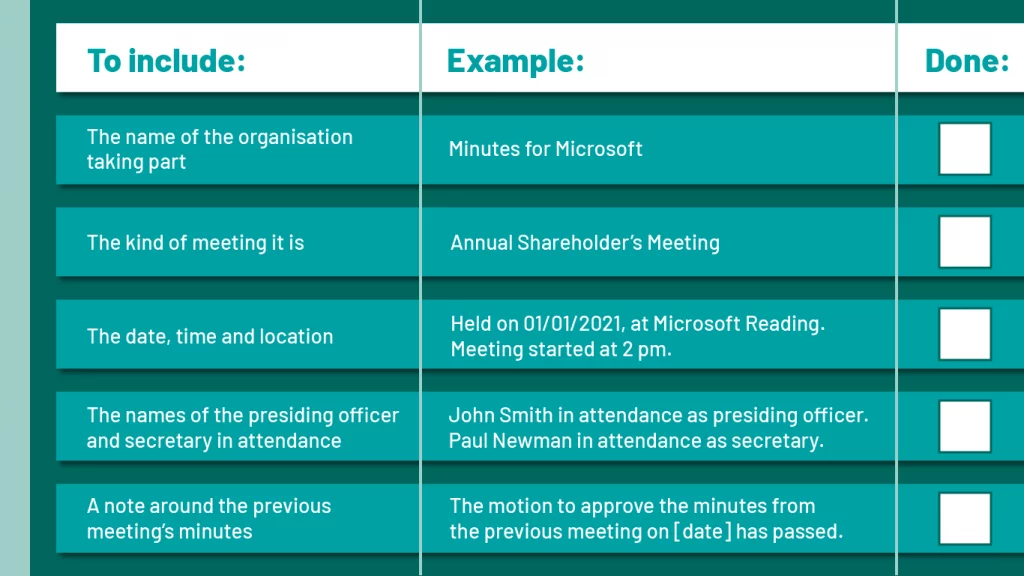
Your minutes should include the first paragraph with the following details (use the following checklist to verify):
| To include: | Example: | Done: |
| The name of the organisation taking part | Minutes for Microsoft | ⬜ |
| The kind of meeting it is | Annual Shareholder’s Meeting | ⬜ |
| The date, time and location | Held on 01/01/2021, at Microsoft Reading. Meeting started at 2 pm. | ⬜ |
| The names of the presiding officer and secretary in attendance | John Smith in attendance as presiding officer. Paul Newman in attendance as secretary. | ⬜ |
| A note around the previous meeting’s minutes | The motion to approve the minutes from the previous meeting on [date] has passed. | ⬜ |
The body of the minutes
The next section is the body of the minutes - which cover everything that happens in the meeting. This includes:
- All main motions and who they were made by (you don’t have to include who seconded them)
- Motions that bring a new question before the meeting
- The final wording of any motion adopted or disposed of, including any debates or amendments if this is appropriate
- Information about the vote including the type of vote and what kind of ruling there was (majority, two-thirds vote etc.)
- Secondary motions
- Notices of motions
- All points of order (including appeals)
- Any disorderly conduct: the words used must be noted to set a future precedent.
Adjournment and signature of the secretary
Once the meeting has been adjourned, secretaries can then finalise the minutes. In this section, it’s important to include/note:
- Any motions or debates that were over to a committee and their report
- Any informal questions
- The full text of any officers’ reports mentioned during the meeting (or point to an area where this is available)
- The names of guests and their presentation without a summary of what they said
Submit the draft minutes as “for approval” until they have been signed off by all members.
Since it is a legal record of what was said, secretaries must sign the minutes as evidence that the minutes are authentic.
Approval of and corrections to the minutes
All corrections should be added before the next regular meeting. Only then can the secretary finally approve the minutes. If you’re using a paper-based process for this, this step can be very time-consuming because it will require a lot of printing, signing and chasing of directors. This problem can be solved with a cloud-based board meeting portal that allows participants to edit the meetings online, on any device they like, with the highest level of security.
Finalised form of the minutes
Once agreed, the copy including amendments or corrections will be signed and dated by the secretary. If you’re using a digital solution, this can be done without printing the documents by simply placing a valid electronic signature.
Meeting minutes templates
To get started, try one of the following templates for your next meeting.
Minutes of a formal meeting
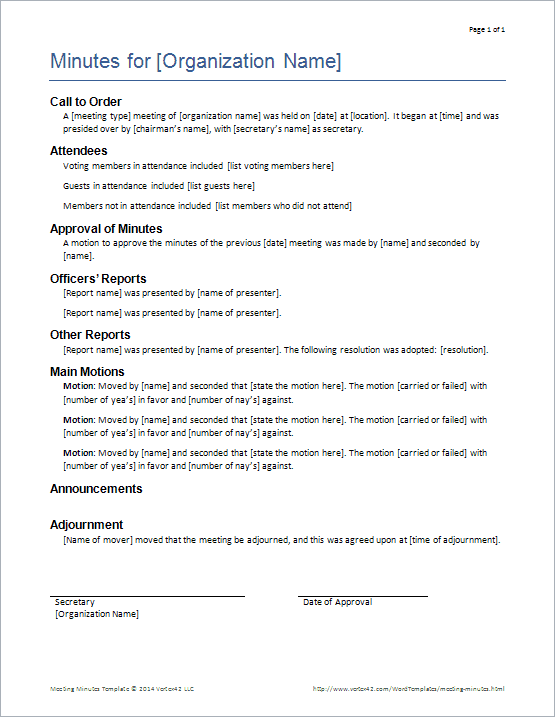
Minutes for [Organisation]
Call to order
A [meeting type] meeting of [organisation] was held at [date] at [venue]. It began at [time] and was presided over by [presiding officer or chairman’s name] with [secretary’s name] as secretary.
Attendees
Voting members in attendance: [list]
Guests in attendance: [list]
Members not in attendance: [list]
Approval of minutes
A motion to approve the minutes of the [previous date] meeting was made by [name].
Officer’s reports
[Report name] was presented by [officer’s name]
[Report name] was presented by [officer’s name]
[Report name] was presented by [officer’s name]
Other reports
[Report name] was presented by [name of other presenter]. The following resolution was adopted: [resolution]
Main motions
Main motion: Moved by [name]. The motion [carried or failed] with [number] in favour and [number] against by a ballot vote.
Main motion: Moved by [name]. The motion [carried or failed] with [number] in favour and [number] against by a ballot vote.
Main motion: Moved by [name]. The motion [carried or failed] with [number] in favour and [number] against by a ballot vote.
Announcements
Adjournment
[Name of mover] moved that the meeting be adjourned, and this was agreed upon at [time of adjournment].
Secretary signature
Date of approval
Minutes of a basic meeting
Minutes for [Organisation]
Location:
Time:
Date:
Attendees
Members in attendance: [list]
Members not in attendance: [list]
Agenda items
- Agenda item and presenter
Action items
- Description, responsibility and due date
Other notes
Tips for keeping better minutes using Robert’s Rules
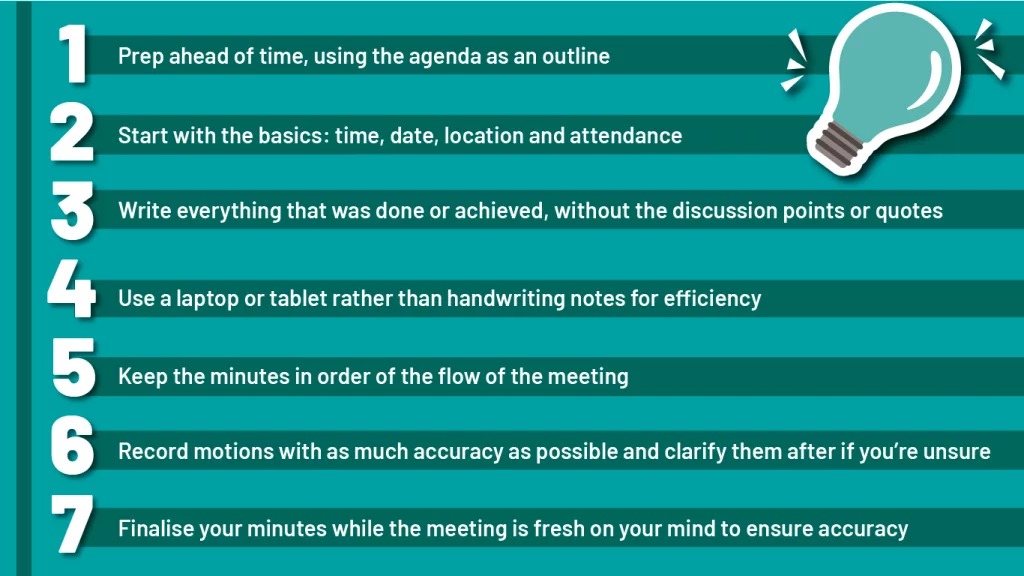
To keep your meeting minutes clear and concise, use the following tips:
- Prep ahead of time, using the agenda as an outline
- Start with the basics: time, date, location and attendance
- Write everything that was done or achieved, without the discussion points or quotes
- Use a laptop or tablet rather than handwriting notes for efficiency
- Keep the minutes in order of the flow of the meeting
- Record motions with as much accuracy as possible and clarify them after if you’re unsure
- Finalise your minutes while the meeting is fresh on your mind to ensure accuracy.
If you’re looking for more best practices, check out our selection of minute taking tips.
FAQ
We’ve put together some Frequently Asked Questions (FAQs) and reminders when it comes to Robert’s Rules of Order or RONR.
What information do you need in board minutes?
It’s important to include the following in your board meeting minutes:
- The date, time and location of the meeting
- The meeting type
- The names of the presiding officer and secretary
- Any reports or presentations from the presiding officer, officers or guest speakers
- All main motions, including votes and the type of vote cast
- Any points of order
- The time when the meeting was adjourned.
What can the secretary leave out of minutes?
Secretaries should generally leave names out of minutes, with the exception of the presiding officer, secretary, committees and guest speakers. For example, in a debate, you wouldn’t note any quotes or who was on which side of the conversation. You can also leave out information about who seconded any motions in the minutes. Finally, you can omit any action items or to-do lists, except in the case of informal or basic meetings.
How do you write a motion for minutes of a meeting?
To write a motion for minutes of a meeting, use the following format:
Main motion: Moved by [name]. The motion [carried or failed] with [number] in favour and [number] against by a ballot vote.
You don’t need to include who seconded the motion, but you may wish to include any amendments made to the original motion put forward for clarity.
Is there a difference between a formal meeting and an informal one as far as minutes are concerned?
Yes. The minutes for formal meetings are often legal records, so minutes must be kept in a certain way to make sure everything necessary is included. For informal meetings or board meetings with less than 12 members, you can keep notes on attendees, the meeting agenda, discussion points and action points.
If minutes of a previous meeting are corrected, are the corrections entered in the minutes of the meeting at which the corrections were made?
The corrections should be written into the minutes being approved. The minutes of the meeting in which you are approving the previous minutes should just say that they were approved "as corrected".
Conclusion
While keeping the minutes is a big responsibility, there are a few ways to make it easier for yourself. By preparing ahead of time, keeping accurate notes during the meeting and finishing up quickly once the meeting has adjourned, you can make them as accurate as possible. If you’re still stuck, use our Robert’s Rules of Order Minutes Template to give you a helping hand!
References and further reading
- Robert’s Rules of Order: Beginner’s Guide
- Robert’s Rules of Order: The Agenda
- Robert’s Rules of Order: Cheat Sheet
- Robert’s Rules of Order (Fourth Edition)
- Robert’s Rules of Order (Newly Revised)
- The Principles of Parliamentary Procedure
- Robert’s Rules of Order: The Official Website
